by Civenge
So you think you’re ready to properly plan a build, exile? Then you are at the correct place. Path of Building (PoB), whether you use the official community tool by Openarl here, or the community fork located here, is the best tool for build planning. The main difference between the two is the community fork continues to have new features added, while Openarl is focused on other things now. For that reason, I suggest using the community fork. Continue reading to learn How to Use Path of Building.
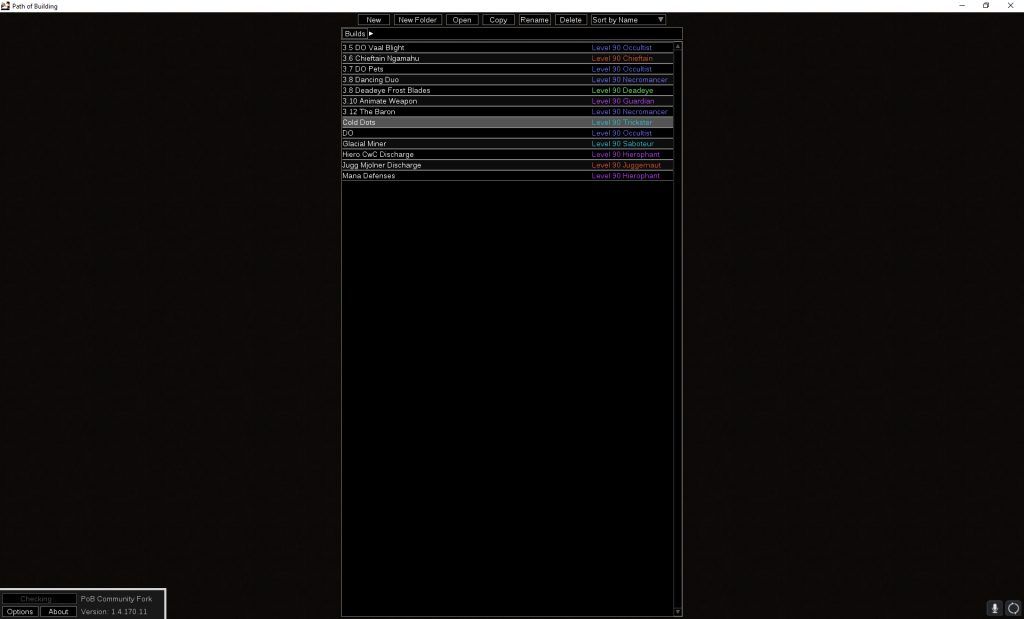
I’m going to skip over how to download and install the tool, and jump into usage of the tool itself. When you first load into PoB, you’ll start at a blank canvas with no builds. Below you will notice I have several builds already complete which I have saved as with useful naming convention.
Step 1 – Making a New Build
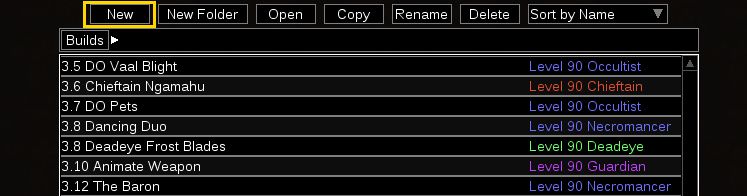
Pick a new build, since you won’t have any builds created yet. Even if you want to use someone else’s pastebin link from a build guide, you still have to hit “New”. We’ll talk a bit more about importing builds later in this guide.
Once you are in the new build, you need to figure out if you are going to build around a particular Active Skill Gem, Ascendancy or Unique item. If you don’t know what you want to do, feel free to explore various options, but having a starting point is extremely important to progress to a final build.
I’m going to create a build here, with my own thought process so you can follow a similar process. For this example I’m going to make a cheap league starter Trickster using the active skill Vortex.
Step 2 – Setting the Class and Ascendancy
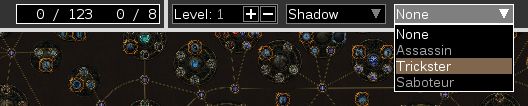
Choose the correct class and ascendancy at the top middle of the screen, in Step 1 we said this was going to be a Trickster build, so we will pick Shadow and Trickster:
Before we go much further, save your build as something descriptive that makes sense to you. I like to include the game version that I plan to play this character in for future reference. In this instance, I’ll call this “3.12 Vortex Trickster” and move forward. Note that you can make folders as well if you want to do a lot of build planning and organize more builds, but so far I have not found this necessary. I only keep successful builds and if something doesn’t work, I delete it.
Step 3 – Inputting Your Main Active Skill
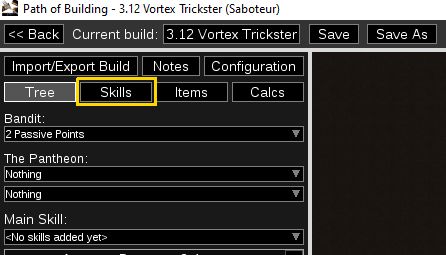
Having saved the build, the next thing to do in Path of Building is inputting your main Active Skill. Swap from the “Tree” tab to the “Skills” tab near the top left portion of the page. For the rest of the guide, I will refer to these as Tabs.
Once you are in the skills tab, you will need to pick a “New” skill and start typing in the name of the skill gem you want to add. Note that you can put in any active or support skill gems in any order here. I typically start with the active skill gem followed by the support gems, but it is personal preference.
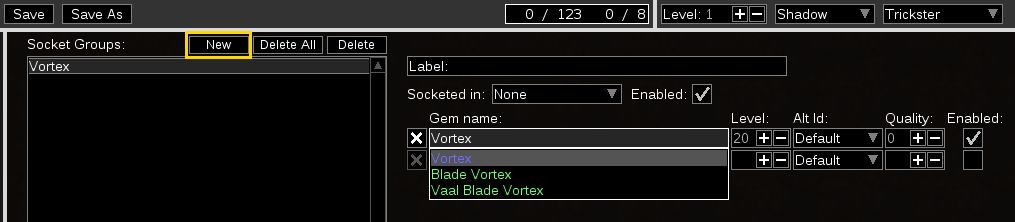
Click on the skill Vortex and it will input into the first slot. Now you are free to add in any support gems, and Path of building is nice enough to auto sort them by highest damage increase. There are a LOT of caveats here though, so be careful to blindly trust what support gems actually give you the biggest damage increases. For now, let’s skip the support gems and look at the Passive Tree and Ascendancy Points.
Step 4 – Ascendancy Points and Passive Tree Allocation
Go back to the “Tree” tab and if you zoom out far enough, you’ll notice the Ascendancy for Trickster is highlighted. Zoom in and within it you can hover over each node to see what they do, but more importantly, you can check the box for “Show Node Power” and it will color code damage nodes as red, and defense nodes as blue. The stronger the color, the more benefit you gain from the node. In the picture below, you will see that a few of the Ascendancy nodes give a fair bit of damage. those are the nodes to pick for offense.
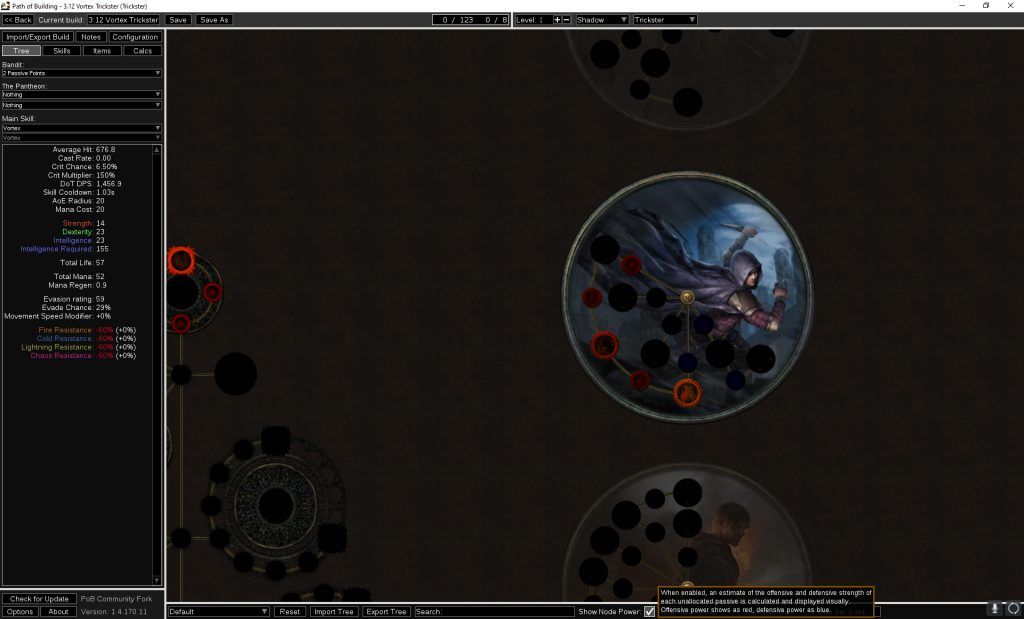
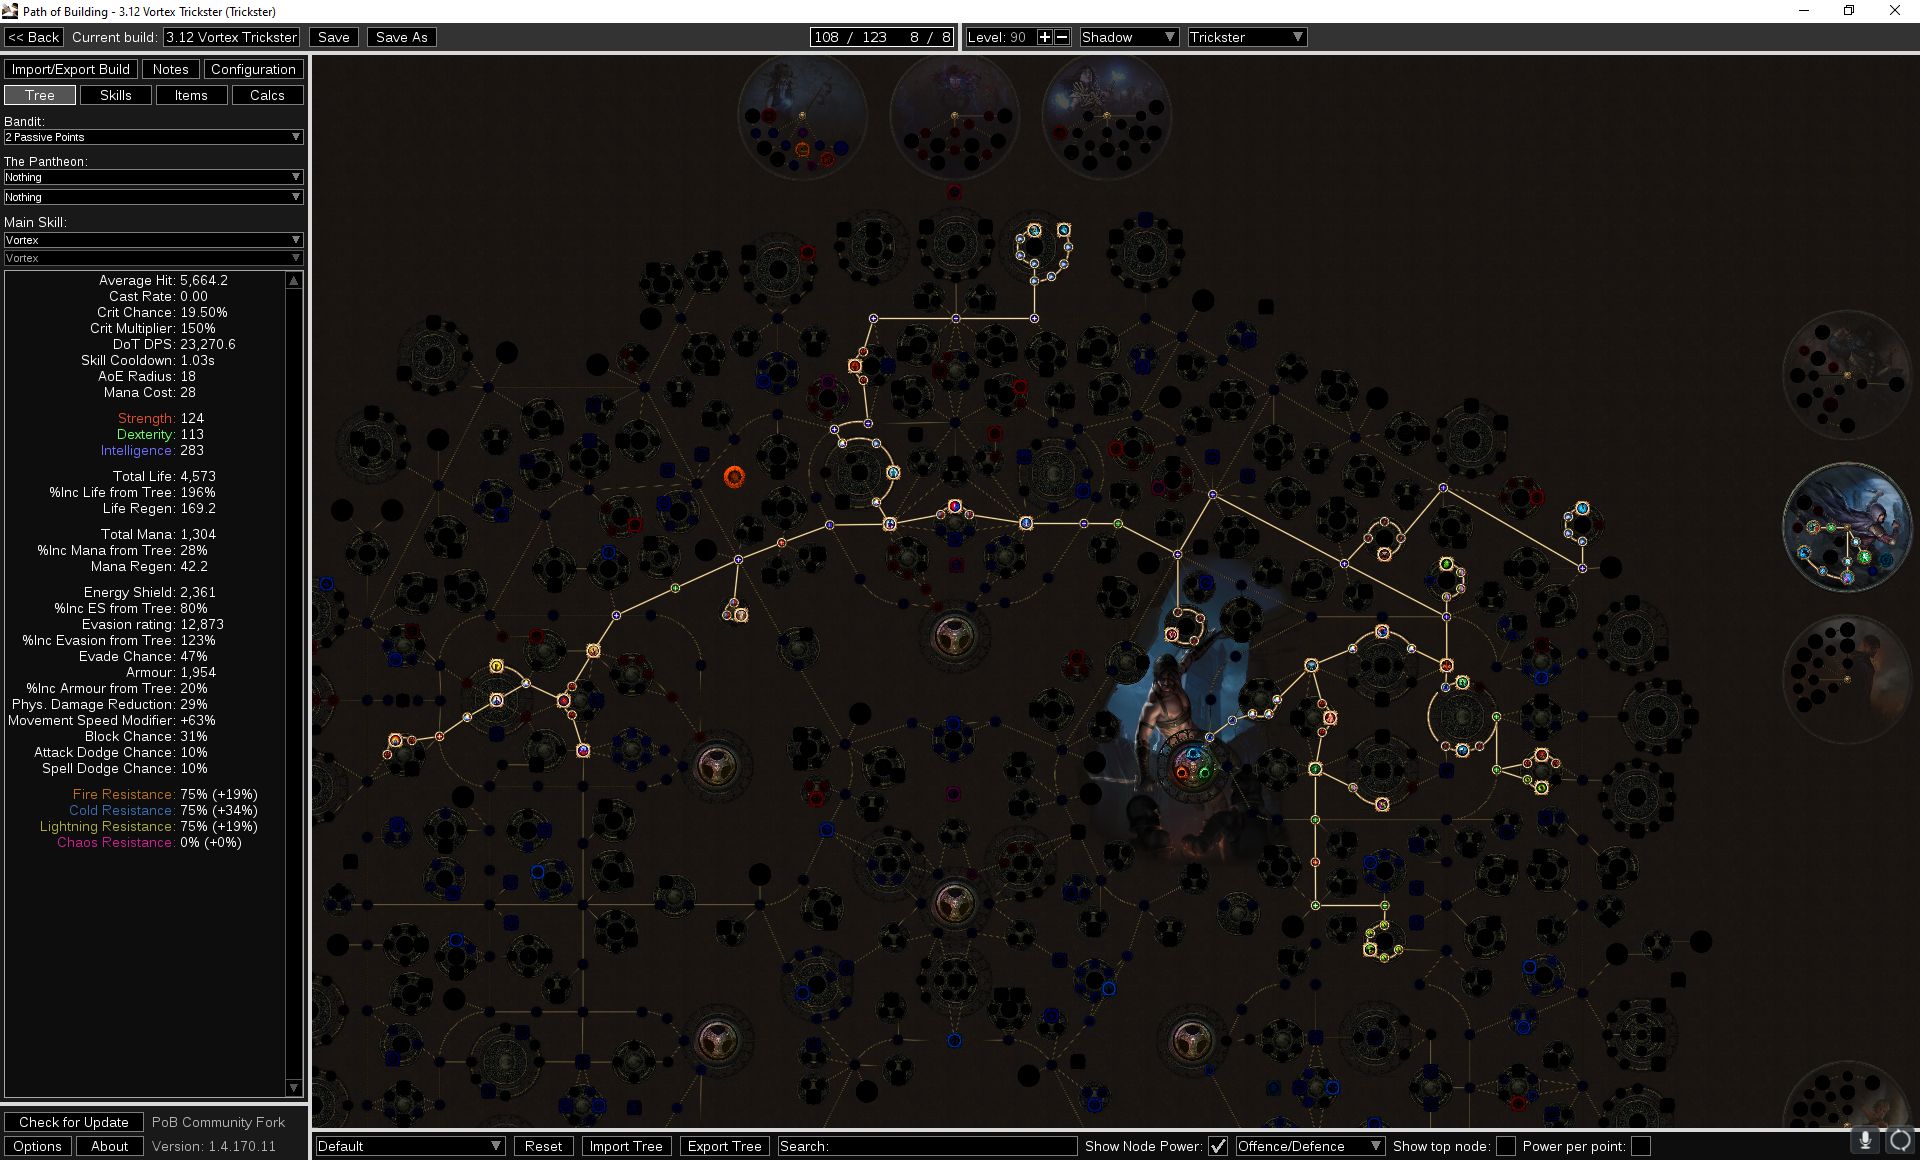
Let’s spend 4 ascendancy points to take Patient Reaper and Prolonged Pain. Together these increase our Vortex Damage over Time by almost 48%. We’ll focus on the other 4 ascendancy points later on when we look at defenses. Zooming back out and looking at the skill tree, most of the red nodes are located on the upper half of the tree. This gives us some direction as to where to go with this build.
At this point I like to figure out if I’m going for a life, energy shield or a hybrid build. Since this is a budget league starter build, let’s stick to life. In the search box at the bottom middle of the screen, you can search any node for a keyword. Type in “increased maximum life” and let’s see where life nodes fall in relation to our juicy damage nodes.
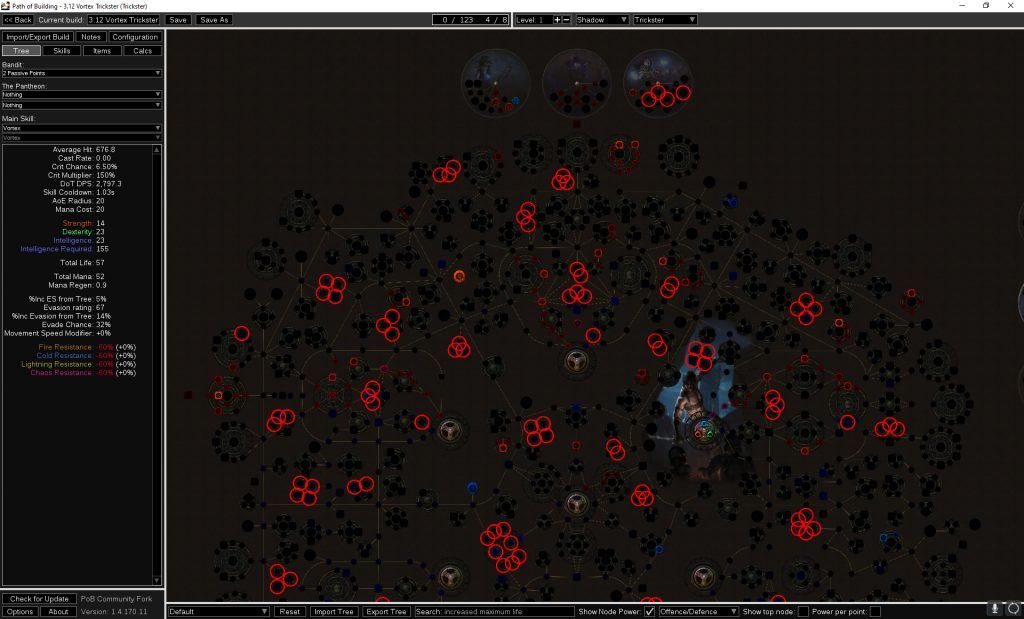
All of those red circles are potential life nodes, and now we need to figure out the most efficent pathing to grab both life and damage. Defenses will come later when we look at gear and other gem setups as we further refine the build. I’ll go ahead and put together a tree and show it below as an example.
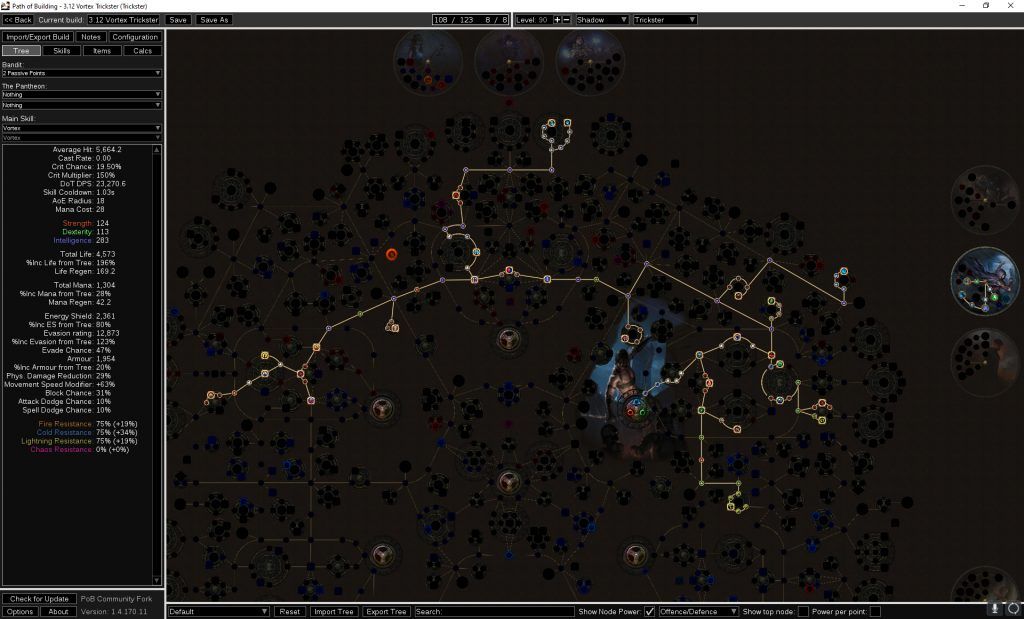
This is a skill tree for around a level 85 character. It has enough increased life (196%) and damage nodes to be viable. This will be our blueprint for when we level, and having a blueprint will greatly speed things up. If you look at our damage though, it is pretty pathetic. That is because we haven’t enabled our support gems as of yet. Let’s do that now.
Step 5 – Inputting Support and Other Gems
Jump back over to the Skills tab. Underneath Vortex, let’s put in some supports. At any point you can enable or disable these supports, change them out, or just try different combinations to see what it does. In this case, we’ll add in 3 support gems to see what a 4 link setup would do by adding: Efficacy, Controlled Destruction and Swift Affliction. The damage over tripled.
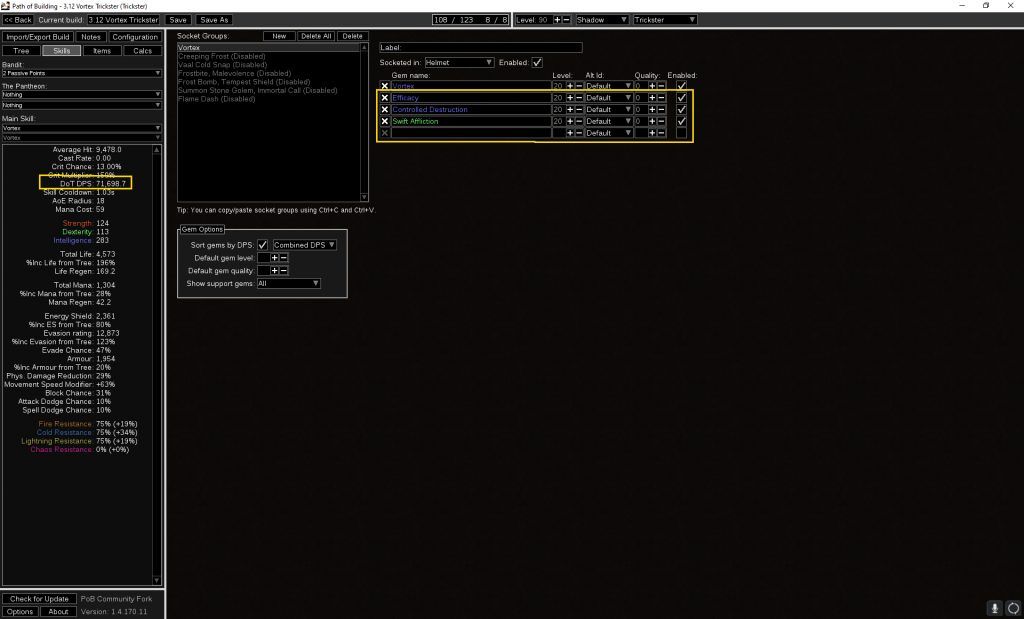
You will see a different result, and that is because what I didn’t tell you previously is that I have gear already picked out for this character and in this case I assigned the Vortex to be socketed in the Helmet, more on that later. We’ll jump into gear soon, but let’s figure out the rest of the gems first.
There are a number of other active and support gems I have listed above as disabled. Let’s go ahead and reenable those now. Vortex is an instant cast spell, so you can pop it often without stopping. There is a short cooldown, so in some instances you will want a secondary skill to add additional damage such as for bosses or rare mobs. Here I have 2 options shown, either Creeping Frost or Cold Snap. I’m actually not sure yet which I want to use, but leveling both at the same time is a viable option and I can decide which one I like better since they will have the same support gems, and both scale off of cold damage over time like Vortex does. Whichever gem isn’t being used, put it in your weapon swap so it continues to level with you.
Here is a list of the rest of all the gems and any support gems with corresponding gem level, if no gem level is listed then max them out:
- Vortex – Efficacy – Controlled Destruction – Swift Affliction
- Creeping Frost/Cold Snap – Efficacy – Controlled Destruction – Swift Affliction – Hypothermia – Concentrated Effect
- Blasphemy – Frostbite
- Cast When Damage Taken (lvl 1) – Frost Bomb (lvl 10) – Tempest Shield (lvl 6)
- Cast when Damage taken – Summon Stone Golem – Immortal Call (lvl 11)
- Flame Dash – Arcane Surge (lvl 5)
And these gems can be fit into any open sockets without being linked to anything in particular:
- Malevolence
Most of the choices above should make sense if you are a veteran PoE player. There are some support gems that may provide slightly higher dps, but these listed support gems have no conditional modifiers that need to be met, such as the mob being chilled. Feel free to adjust the support gems to your liking. I also avoided Awakened skill gems because this is a budget build, and stone golem was used for a bit of additional survivability. Between Blasphemy and Malevolence, we will reserve 85% of our mana, leaving us enough left over to cast spells fairly quickly.
Step 5 – Gear
As mentioned previously, I already have gear on this build. Change over to the “Items” tab to start inputting your own gear. Gear is a very important consideration. I do not recommend maxing out to have perfect “mirror” quality gear. The odds are you will not achieve this unless you play 12 hours a day, all league long. If you are that person, you probably aren’t reading this guide and have already used PoB previously. I leave all gear at the mid-range rolls so I get a more realistic view of what the build will look like on a budget version.
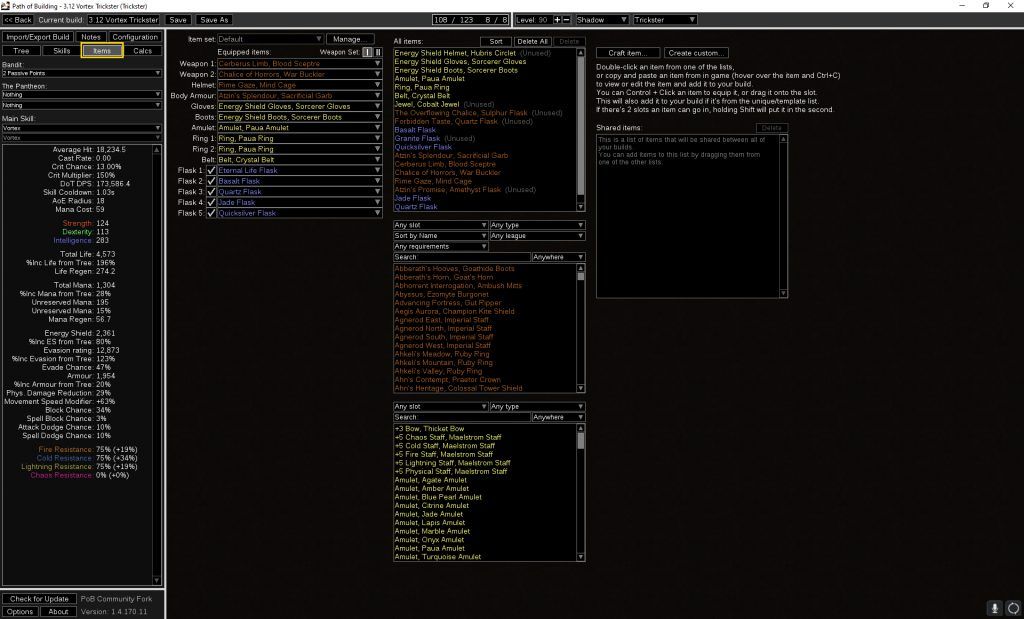
On this iteration of the build, I have a mixture of Unique Items and Rare items. Since this is a budget build, I left out jewel nodes since the ones that provide the best increases are going to be quite expensive. None of the items listed above are overly expensive and there is a lot of room for growth. There are a couple of key takeaways from the Items screen: crafting items and sorting uniques, which I will go over.
Step 6 – Sorting and Utilizing Uniques
For this example, I will go over the reasoning for usage of the Unique helmet Rime Gaze. First let me pretend I have no helmet equipped, and that I want to see what Unique helmets would provide me the most increase to Damage Per Second (DPS). Changing the type to “Helmet” and the sort to “by Combined DPS” will allow PoB to give you a list of results that of the highest DPS uniques, see below:
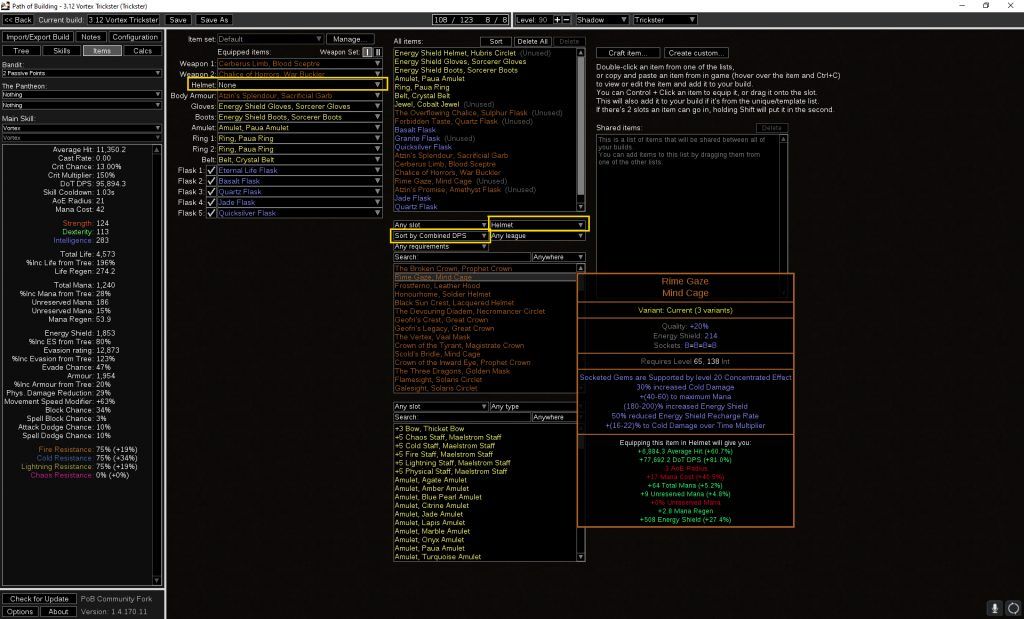
The really neat thing is that PoB will tell you any increase in green, or reductions in red. For example, Rime Gaze gives us an increase of 77,000 DPS but at a cost of -3 to Area of Effect. This is because it has the “Socketed Gems are supported by level 20 Concentrated Effect” attribute. This is the reason that I had picked this Unique helmet since it is a cheap 5-link. Using the various filters you can pick out Unique items to fill any and all slots, but generally you want to have some rare equipment in there to stack enough added life and resistances. Rare gear is generally better, and more expensive, than Unique gear.
Step 7 – Crafting Rare Gear
For the rare gear, you can create anything you want that follows the rules of Path of Exile regarding prefixes, suffixes, corruption, etc. You can adjust the rolls individually, or even import your character and current gear at any point. Now I will show you how to properly craft some rare boots. Taking a look back at our “Skills” tab, I see that most of our skill gems require intelligence (blue) or dexterity (green) gems. With that in mind, we should look for either Intelligence or Intelligence/Dexterity based gear.
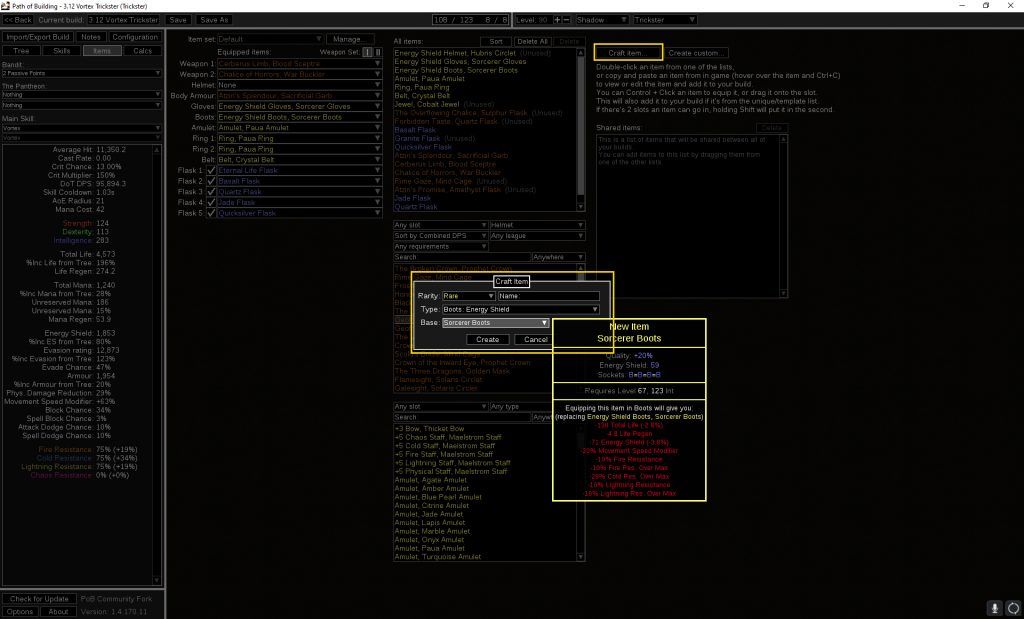
For this example I will make a rare intelligence based pair of boots. In the “Items” tab, click the “Craft Item” button, then input the rarity, type and base you want. Again, we want rare energy shield boots:
Click “Create” and then you are on to the next screen where you can input your prefixes and suffixes, corruption and more. For the purposes of this guide, we will just focus on standard prefixes and suffixes. Pick out the attributes you want, the standard being increases to life, life/es, movement speed, and the 3 elemental resistances. By default the each will pick the middle roll for the attribute, but you can slide those up or down as you see fit. I will leave the default values as shown:
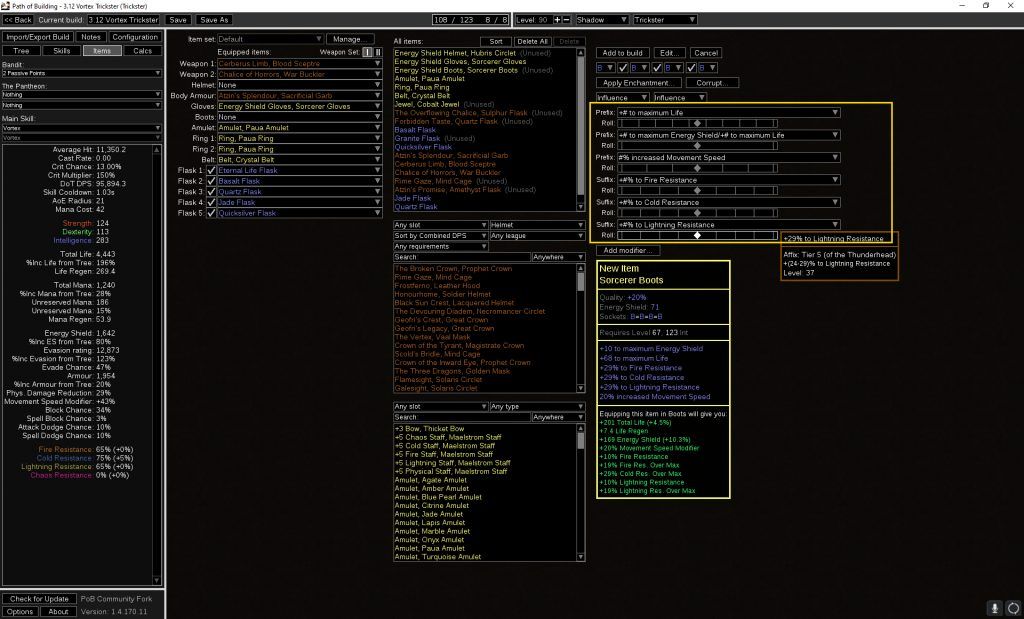
You can also see the finished product down below, with all of the increases or decreases that you will have from using this item over what you currently have equipped. Since I had the Boots slot empty, everything is in the green as an increase. Click “Add to Build” and they will take the empty slot where the boots are in the Equipped Items area. If you already have something there, click the dropdown next to boots and choose the new item at the bottom of the list to swap to it. Continue forward until you have every gear slot complete, fill in the flasks, and follow the same directions to craft any jewels if you have a jewel slot on your passive skill tree. I don’t have any jewel slots above because this is a budget build, but they would appear below the flasks.
Step 8 – Configuration
So now that you have your character mostly built, it is important to make sure you have a realistic assessment of how it will all come together. This is done in the “Configuration” tab. Here you can adjust all kind of settings, combat settings, map modifiers and effective DPS toggles. For simplicity sake and because we used straightforward support skills, the main settings to toggle are using power charges, frenzy charges and setting the enemy boss to “Shaper/Guardian”. This is the standard that most builds use to compare DPS between builds. As a Trickster, you gain power and frenzy charges fairly often through killing, so I feel comfortable having those boxes checked.
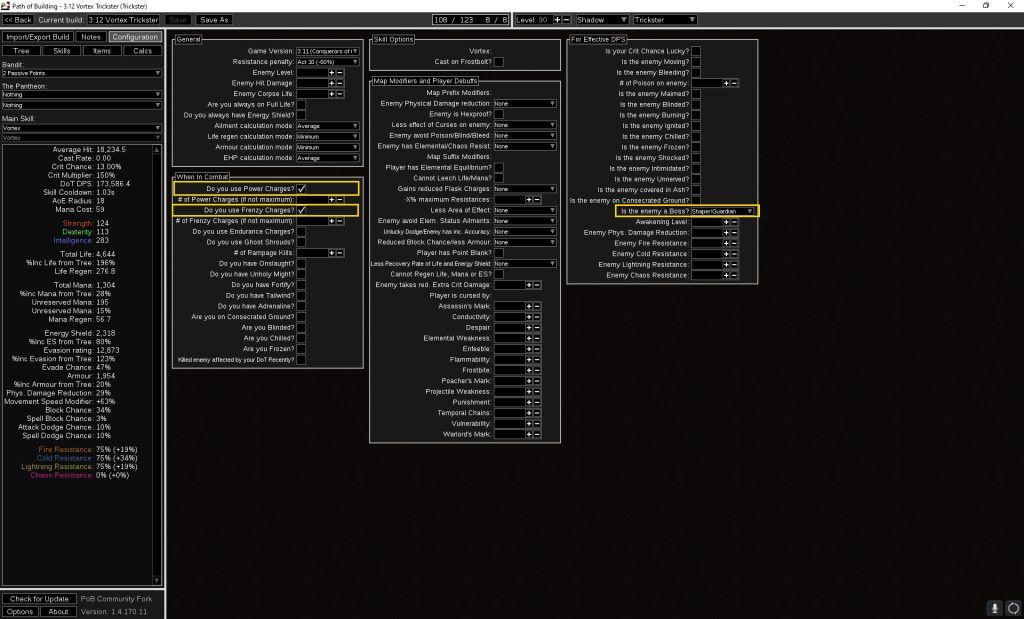
Note there is a dropdown for choosing your main skill on the left hand column, which is currently set to Vortex. Here you can swap to any other active skill to see more detailed information about damage, critical strike chance, etc. Also displayed is your life, mana, stat totals, resistances and much more. It is important to have your elemental resistances capped out, and preferably over-capped by around 20 for map mods.
So what’s next? Well make sure you spend the last 2 ascendancy points. In this case I picked Swift Killer for additional damage and Ghost Dance for defences. If you were to make an energy shield based character using Chaos Innoculation, drop Swift Killer and take Escape Artist instead. You would also have to path your skill tree differently to take increased energy shield nodes instead of life nodes, recreate your rare gear to focus on energy shield, etc. But the good news is you know how to do that now after reading this guide on How to Use Path of Building.
Step 9 – Importing and Exporting Builds
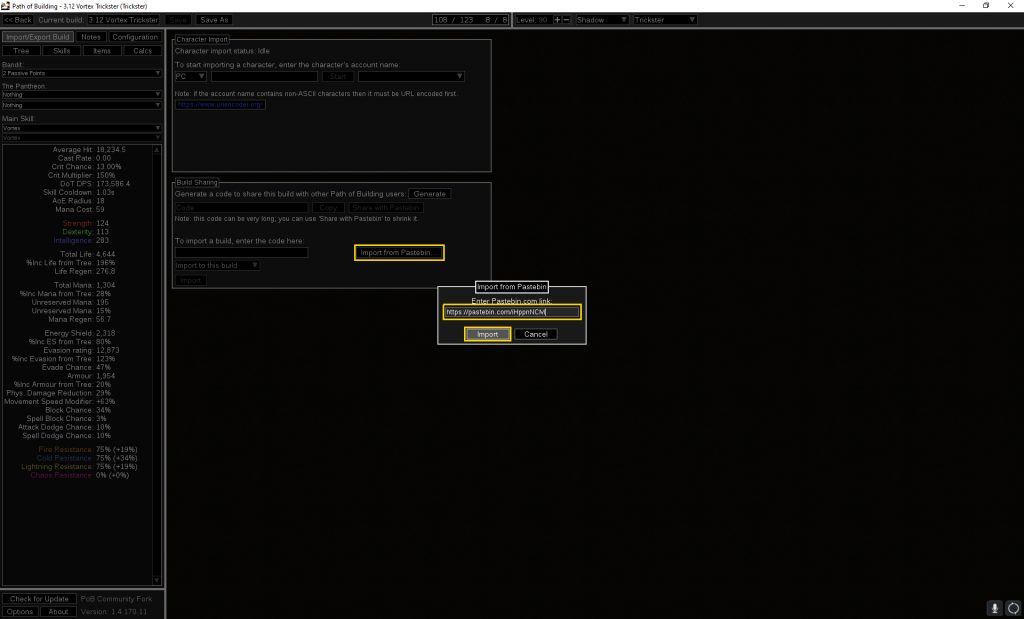
This could have just as easily been step 1, but I believe it is important to understand what you are looking at before copying a Pastebin code from a build guide and slapping it into PoB. For importing a build, head to the “Import/Export Build” tab. Click the “Import From Pastebin..” button, paste the code, and click import. If the code is valid, there is a green notification. Click Import, then Import again at the bottom of the Build Sharing section and you will bring in the exact build with all gear, passive skills and everything else.
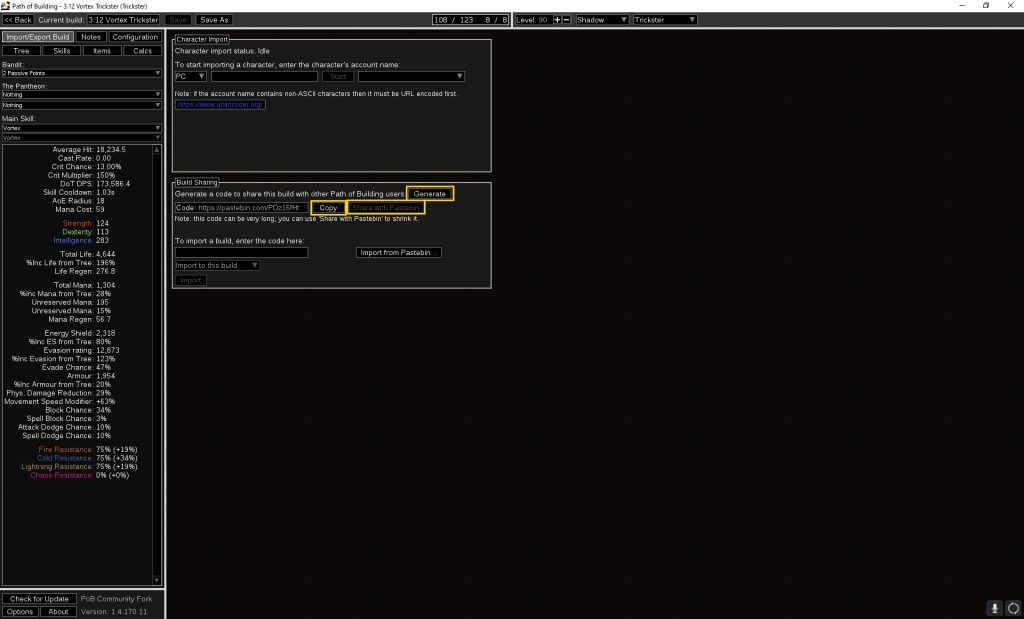
Exporting your build to share with others is also fairly easy. In the same Build Sharing area, click Generate, then “Share with Pastebin”. Copy the code and paste it wherever you want to share your build. Importing that code follows the steps listed above.
Step 10 – Conclusion
That’s the basics Exiles! You now know how to create, import and export a build and most importantly how to use Path of Building. There are a lot of features here, and I personally enjoy planning out builds in between leagues using this community made tool. As always, if you have any questions feel free to stop by when I’m streaming over at https://www.twitch.tv/civenge and ask questions. Also take a look at my Path of Exile Game Guide over at https://civenge.com/path-of-exile-game-guide/. Stay safe Exiles!